Pages

Friday, October 26, 2012

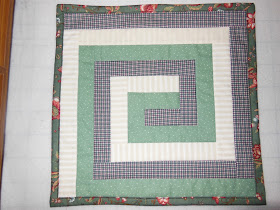
Greek Key Log Cabin Quilt - It's Done!

Please vote for my entry in a weekly contest at


http://quiltinggallery.com/2012/10/26/quilts-with-dots-checks-stripes/ 

Mine is the 5th item on the list. 

Scroll all the way down to vote for Greek Key Log Cabin Quilt. 

I'd be very honored if you do!


Front
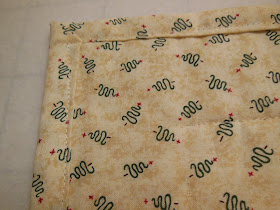
Back
And Center!

You can turn it this way
That way
And the other way!

Thanks!

Monday, October 22, 2012

Greek Key Log Cabin Quilt - Design Phase

The quilting bug is biting really hard this week, so I'm back in business! Two challenges caught my eye and, as usual, I will be entering both challenges using one quilt.  Don't ask me why, but the Greek Key design has been floating around as my inspiration.


Desi Quilters' October challenge stipulates:

1. Make a STRIP QUILTED item of any size
2. Creativity counts
3. Post your entry in this doc as well as the challenge album.
(The first person to finish the challenge, creates the challenge album)
4. Post it BEFORE 6 PM IST, 31st October 2012


Quilting Gallery's weekly challenge stipulates:

The theme for next week's quilt contest is Dots, Checks, Stripes. You are free to interpret the theme as you see fit. Your quilt may represent the theme in the design and/or in the fabrics chosen. Any quilting style is acceptable. You can submit quilts of any size that are completely finished, i.e. quilted and bound.

Additional challenges I imposed upon myself (why, oh why do I do this to myself?):

1.  Must use fabrics from my stash.
2.  Use fat quarters only.  I refuse to cut into yardages if there is any possible way around it.

I should have checked the Internet at the start, but when have I ever taken the tried and true path?  So I started by picking out the fabrics.


Dots, checks and stripes, right?
My original plan was to use a nifty little technique (I WILL try this again and provide a tutorial sometime in the future) to make a Chevron quilt using the Fence Rail Pattern set on the diagonal, so I cut my strips to the recommended width.

Cut strips to what I thought the instructions said
And went ahead and sewed the strips together in the rail fence design.  And that's when the huge mistake was revealed.  I had mistaken the finished size for the cutting size and realized I didn't have enough blocks to make that quilt.  

Okay, no big deal!  I began laying out the design for the Greek Key design.

But something's wrong!
Yes, something's definitely wrong.  The beige strips are not cooperating!  The link gets broken because I've sewn three strips together.  Too much trouble to reverse sew!

This reminded me so much of my IT experience.  No matter what people say, when the requirements change, go right back to square one - the design phase - and start from scratch!  

And this is when I should have searched the Internet.  Instead I went to my drawing board and got out gridded paper and colored pencils and drew the design.

Looks kinda messy with all the writing on it.
After coloring in the design, I began trying to figure out how to use those blasted strips from the fence rail quilt, couldn't do it and ended up making a mess of my drawing.

Then I decided to scrap the old and begin with a brand new set of fabrics and made a pencil drawing of the Greek Key design.

Yes!
Because I would now be working with fresh fabrics and strips, what emerged when I started entering the sewing sequence, was a Log Cabin quilt!  I never cease to amaze myself!  

I picked out my fat quarters of dots, checks and stripes.

Fresh trio of fabrics
After carefully calculating exactly how long the finished block would be, AND how long the last strip would be, I cut out the strips.

Strips are ready to go!
I'm going to give you a sneak peek of my work in progress because I got some  of the sewing done.

Picture needs rotating - checked fabric is the focus
This is when I checked the Internet and found quite a few links for the Greek Key Log Cabin design, but guess what!  I couldn't find any that used 3 fabrics.  Using 2 fabrics is easy- three's the challenge!

Internet design
At my age, I've GOT to keep those neurons firing in the brain and this entire day has been a workout...mentally, I mean!

Take a look at the completed quilt and a tutorial here.

Cheers!


Monday, October 15, 2012

Twisted Xmas Wreath Quilt


Layered, Quilted and Bound
The wall-hanging measures 22-1/2" square
Although I was not aware of it at the time I wrote this post, a printed pattern for this wall-hanging is available for sale. The pattern will guide and help you to assemble the pieces of the jig-saw puzzle.

This quilt was started as a Christmas in July project, just after I'd acquired the Li'l Twister tool.  The tool simplified the construction of this quilt because of the little feet on the underside of the ruler that grip the fabric and raise the ruler off the seams to make it easier to cut out the 3-1/2" squares.


Or you can make your own template using a 3-1/2" square ruler.

Make your own template
I used a charm pack called Winterscapes, manufactured by Benartex, which was purchased from Craftsy.

Winterscapes 5" square Charm Pack
The inspiration for this quilt came from a post on The Knitting Quilter.  I imitated the fabric configuration to achieve the wreath effect and used graph paper and colored pencils to keep the design straight.


The white squares form a cross in the center and cornerstones in this configuration and the whole block is surrounded by a 3-1/2" border.

Red, White and Green Fabric Configuration
using 5" squares from the charm pack
Tips:
I made sure to consistently place the logo on the Li'l Twister tool in the bottom right hand corner of each square.
I also made a conscious decision to cut the squares from top to bottom and left to right.
The third tip is to cut each square and place it immediately on a design wall in the same order it came off the above block.

Once all the 3-1/2" squares are cut and placed on the design wall, the pinwheels or whirlygigs become noticeable.
Cut squares are placed on work surface
After the horizontal columns are chain-sewn, each row was attached to the row below it and the entire block took on the appearance of a perforated curtain. I pressed odd rows to the left and even rows to the right so that seams were nested which always makes sewing easier.

Horizontal columns are chain-sewn
All the vertical rows are sewn down
I chose a Christmas tree fabric for the borders.  The quilt was measured across the center, horizontally, and two borders were cut to this length and sewn to the top and bottom.

Horizontal borders are attached
The quilt was measured down the center, vertically, after the two horizontal borders were added and two borders were cut to this length and sewn to the sides.  A multi-colored rickrack was sewn along the seam between the quilt top and borders.

Multi-colored rickrack sewn along seams
The quilt top was layered with batting and the same border fabric was used on the back.  I chose to quilt around the outline of the pinwheels.  This quilting is more visible on the back of the quilt.

Quilting on back of quilt
I made straight-edge binding from the same Christmas fabric that is on the borders and the back.  The mitered corners came out really well because of a neat trick I tried for the first time.  I was aiming for a half inch binding. After quilting the quilt, I trimmed the batting and backing a quarter inch away from the four sides of the quilt top.  During the binding step, I stopped stitching 1/2" from each corner, turned the quilt and back-stitched all the way off the top of the quilt. I then removed the quilt from the sewing machine, folded the binding up at a 45 degree angle to the corner and folded it down along the top edge of the batting (instead of aligning it with the quilt top) and then down the side of the quilt top.  I then sewed a 1/4" seam beginning from the top of the folded edge down the side of the quilt top.

Perfect mitered corners
The binding was folded to the back, pinned to make sure the binding on the back covered the sewn line and was sewed in the ditch along the seam of the binding on the front.
Binding is machine sewn on the back
This was a most interesting project, and I hope you will give it a try.  There are still two and a half months to Christmas, so there's lots of time to get it done!

Cheers!